Data entry
Data entry can be done, either to empty entry base, or the data from other period can be fetched as a base, for example last year’s actual or forecast. More on how to use utilize data, see maintenance part (System Admin): How to create entry base.
To start the entry:
Choose the entry level, for example cost center, whose budget is being entered.
Column model (time period) is selected from Columns -menu (budget, forecast, LRP)
Row model (report) is selected from Rows -menu (e.g. P/L stament, Balance sheet)
Finally, the entry is opened from Entry -menu
By using these selections, System Admin is able to create entry button to the Homepage, for the end users, which opens directly into the entry base.
Only one user is allowed to enter data to cost center at a time. If other user is already locking the unit in entry, a message will appear.
Note
When moving on to entry, user is locking dimension for herself. The locking is removed when she exits entry. The dimension locking entry, is so called main hierarchy. It is the first dimension in use, often cases cost center or department. The user rights are defined according to it. Additionally other dimensions, if any, can be used to limit users’ rights. For example, users’ rights to Project dimension.
Entry, column selections
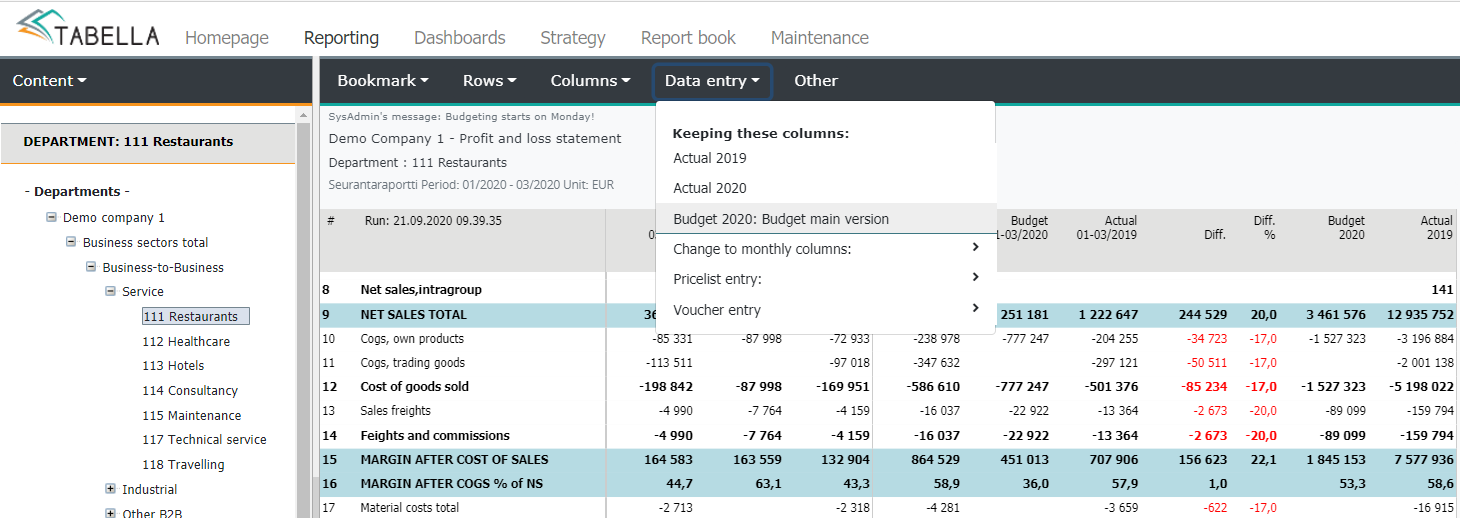
Entry menu has two parts: Keeping these columns and Change to monthly columns.
Keeping these columns refers to the currently selected column model. All periods open for entry, is shown in the list.
Entry using monthly columns
Change to monthly columns, shows all periods’ monthly reports, which are open for entry.
From the monthly columns, Budget main version is selected.

Entry using “Keeping these columns”
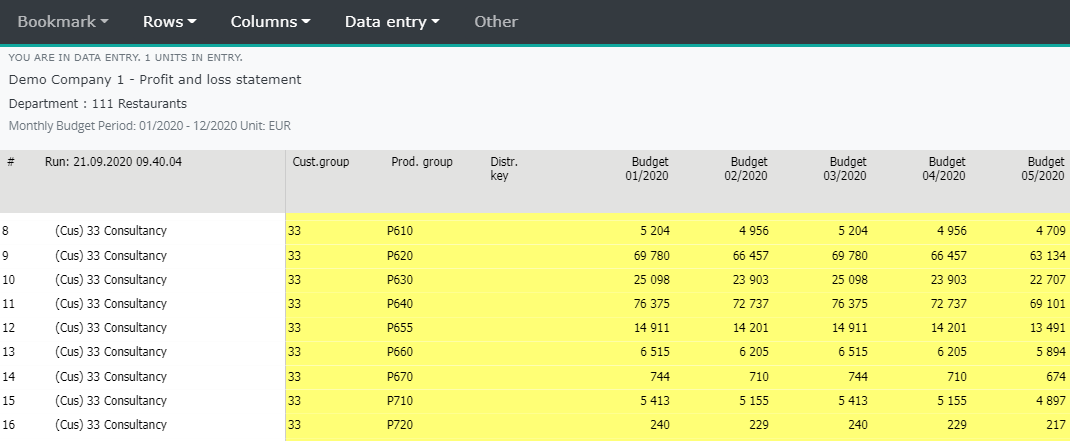
Moving on to entry from the analysis reports column model, which has periods open for entry, enables to utilize difference columns in entry. In the example, there are no distribution key in use, therefore the entry for year total, for empty row, is divided evenly for each month. How to use distribution keys, is explained in more detail below.
Note
The System Admin defines column models used in entry.
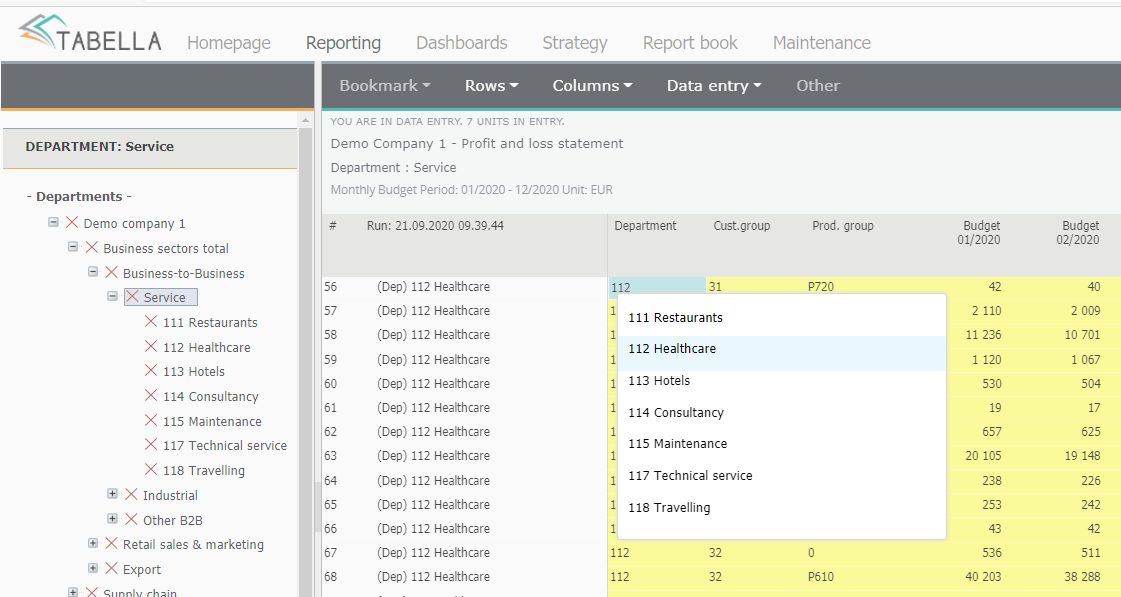
Entry on department sum level.
In the higher level, for example group of departments, the department is selected from the department column, by right clicking it. Select desired unit from the list. In case, a new row is added to the entry base, it is automatically attached to the group’s first department. If needed, change it, as described above. The same applies for other dimensions also, for example Customer.
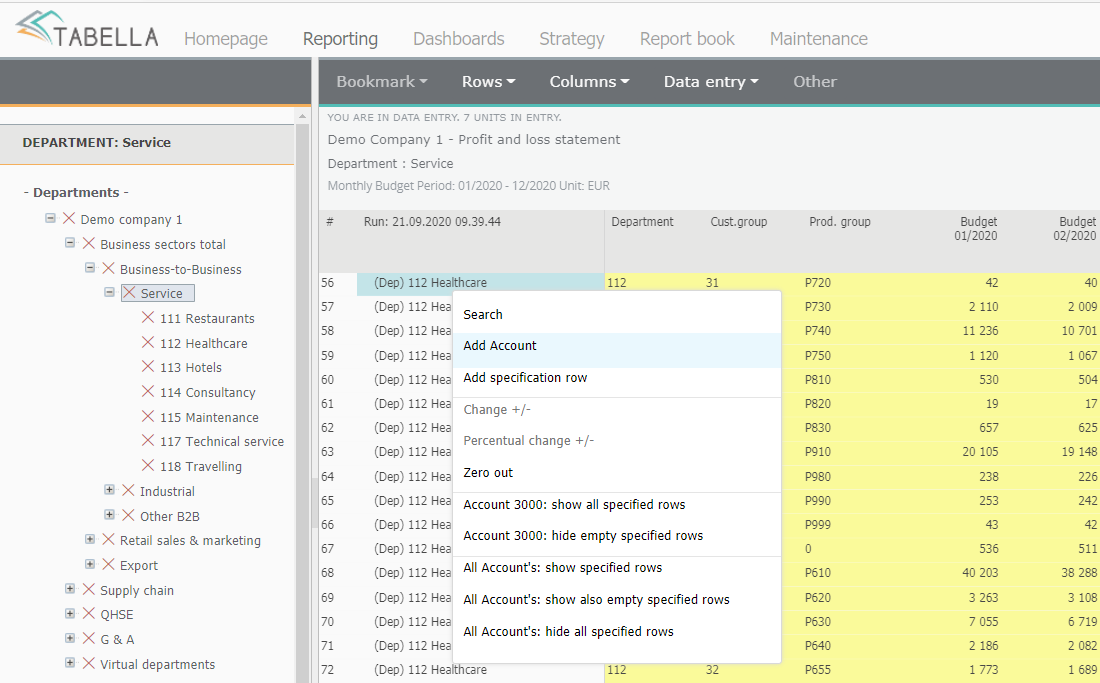
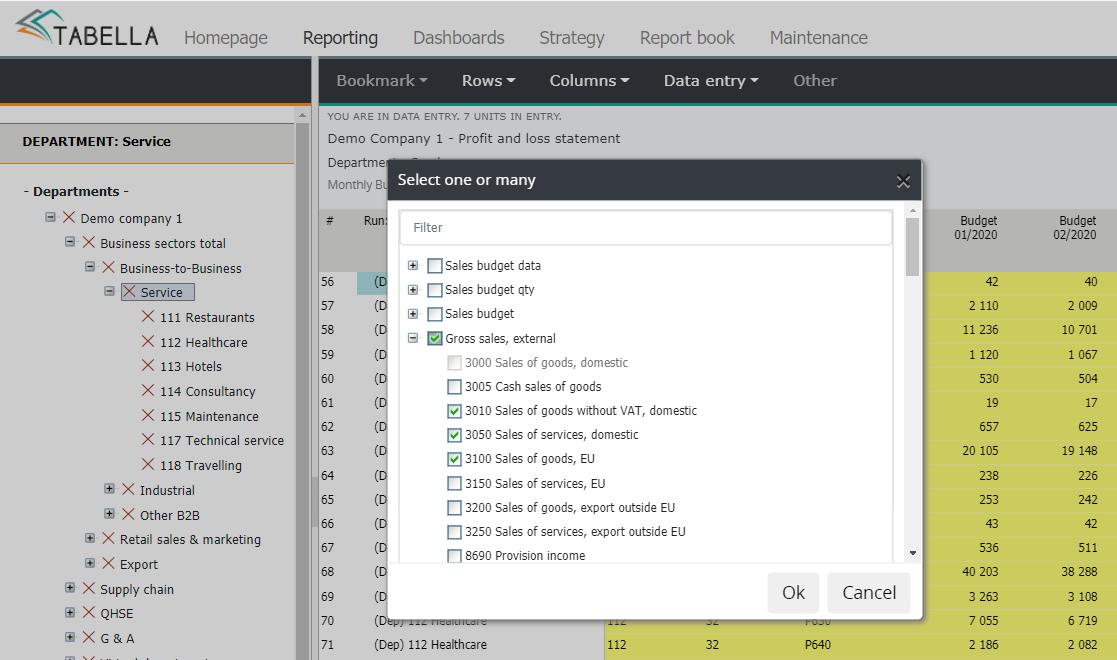
Add new account
To add account(s), right click the row text. If the entry base is empty, right click the “No data” row. Choose Add account. The list of accounts steered to the currently selected row model is displayed. Choose account(s), or the whole group of accounts. Accounts which are opened in the entry base already are grey (disabled). After desired accounts are selected, press OK. Selected accounts are added to the entry base. In the example below, accounts from the account group Gross sales external.
Note
If the chosen period does not contain any data. Then the row model’s all empty accounts are opened to the entry base. After the first entry and saving, only those rows with data, is displayed.
Specifications
At the simplest, the entry is done account/department level. However, it is possible to use specification rows, to specify entered data to existing dimensions in the tree structure. For instance, departments costs are specified by Projects. The System Admin is able to define dimensions accuracy used in entry. There can be fewer dimensions opened in entry, as there are used in actual reporting.
To open specification for account row, right click its row text, and choose Add specification row. Entered specifications are summed to the account automatically. It also possible to utilize comments when specifying account. Explained in more detail below, Commenting entry row.
Note
The System Admin defines whether it is possible to enter data to sum row, which has specifications. If allowed, the entry to the sum, is divided according to existing data, in the same proportion.
Example of specification entry
Add specification to existing account. Entry level is department, and other dimension are at the sum level. Right click account’s row text and choose Add specification row. An empty row is added. Choose desired dimension by right clicking respective column, and make the selection. In the example, the selection is done in dimension Cust. group column.

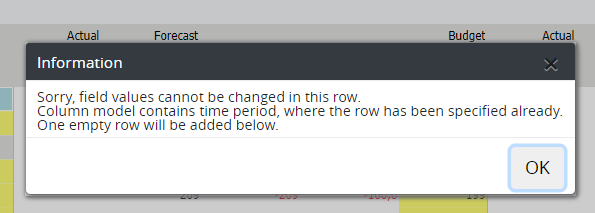
If the column model used in entry, contains columns (time periods), in which selected account row has been specified already, then it is not possible change it directly. New, empty row, will be added below for entry.
Long or Short report in entry
Depending on the settings made by the System Admin, the entry base is opened in long or short format. Normally the long report, showing accounts and sum rows, is used. To add new accounts or specifications is possible only for the long report. If needed, change to the long report by pressing + -button.
If the short report is used, showing only sum rows, then the data entered to sum, is divided according to sum row’s accounts’ which have data already, in the sama proportion. If the sum row is empty, the entered data is targeted to account group’s first account.
Commenting entry row
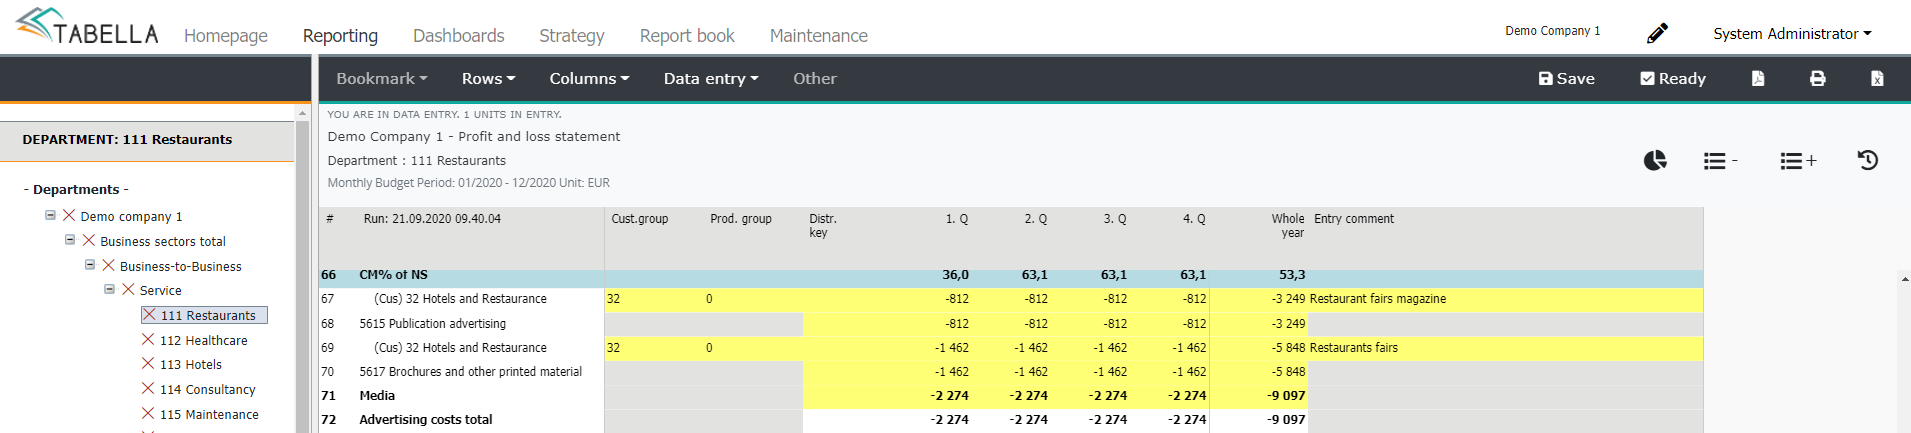
It is possible to comment rows in the entry base. Written comments are shown in the entry base only.
By adding specification rows to account, it is possible to enter account’s data using several rows. Tabella will sum identical data automatically to the account. Please notice, if there is a need to leave rows separately to the entry base, write comment to each row, into the Entry comment column.
Right mouse menu on row text
Right click account’s row text. In addition to adding specifications, it is possible to zero out row’s data, for example.
Note
Paint undivided area, in case several cells is marked in the entry base
- Search
Use, for example, to locate row code from the entry base.
- Zero out account
Use right mouse menu’s Zero out option, to delete row’s data. Although the data is deleted, account’s text remains, until exiting entry or the entry level is changed.
- Specifications, show/hide
To show all specified rows, or hide empty specified rows, can be done either for individual account or for all accounts.
Right mouse menu on entry cell
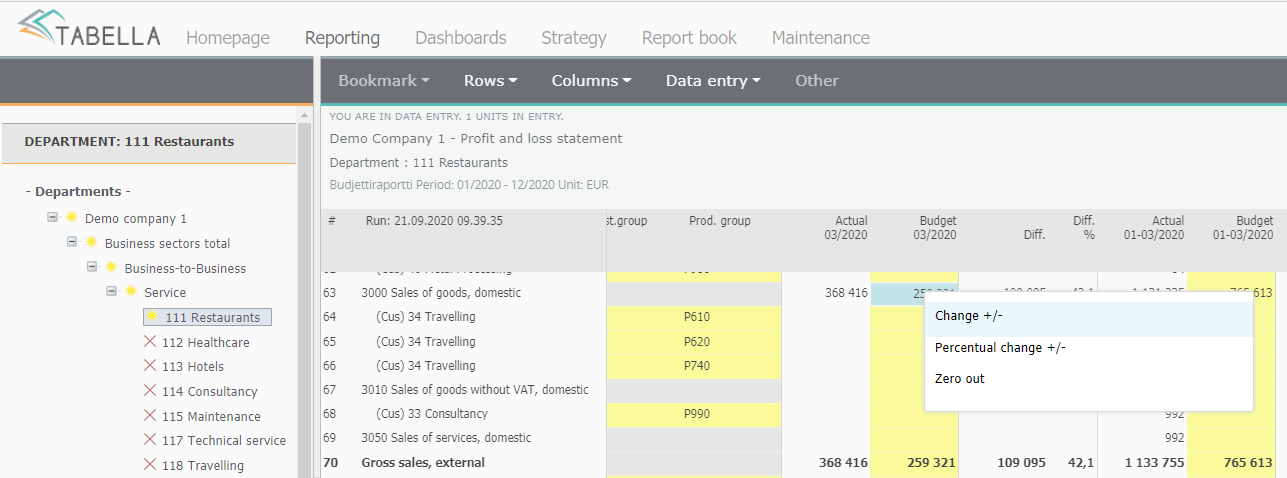
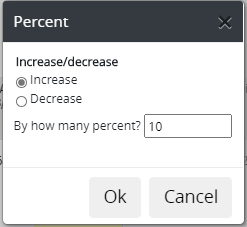
- Report functions
Right click a cell in entry base. Use menu options to increase(+) or decrease (-) cell’s value, with the amount entered. Define percentage change (without % sign). Additionally use option Zero out, to delete cell’s value. Mark several cells at one time, either by dragging with mouse -undivided area- or by pressing and holding keyboard’s ctrl-key, and marking desired cells.

- Rows
Row model can be changed during entry. The list contains all row models user has been given rights to.
- Columns
Column model can be changed during entry. For example, change monthly columns to column set consisting quarters: Columns | Column models for monthly columns | Quarters. All column models in used, are defined by the System Admin.
- Save -button
Using Save -button, an intermediate save is being done, without exiting entry. Remember to perform regularly.
- Ready -button
In case the System Admin has activated the entry process control (“traffic lights”) in use, then a user is able to mark entry as ready for the current unit. This will lock unit’s entry, preventing further entry. However, if needed, the System Admin is able to re-open the entry for closed unit.
- -button
Exit entry.
- Unlock -button
The System Admin can unlock, unit’s entry, which is being locked. Before doing so, it must be ensured, that there is currently no user entering data to the unit. Unlocking can be done in all periods; budget, forecast, LRP and actual. Lockings are explained in more detail, in the Maintenance area’s chapter Periods | Common maintenance routines for periods.
Distribution keys
By using distribution key, the yearly sum can be divided into months, for example for each third month. If no distribution is used, the yearly sum is divided evenly for each month. If the months have data, year sum is divided in the same proportion, to months with data. The system default keys (96-199) enable to use existing periods distribution to distribute data. According to previous years actual data, for example. The distribution key can be changed during entry.
Distribution key column is in use in monthly columns automatically. The System Admin defines, if keys are used in analysis columns. She can also define default distribution key to be used, for each company.
Distribution key in short:
If the entry base is empty, the data entered to yearly sum, with no key, is distributed evenly to each month, or according default distribution key, defined by the System Admin.
If the months have data, and no distribution key is used, the entry to the year sum is divided in the same proportion, to months with data.
Distribution key entered to the sum of accounts, will replace existing keys of the accounts belonging to this sum.
Distribution key entered to sum row is not saved
The System Admin is able to define own distribution keys.
When the account is using any special distribution keys (96-199), do not copy data to the added specification row. If the entry is done to a month of the row with distribution key, the key in use is being set to zero -no distribution.