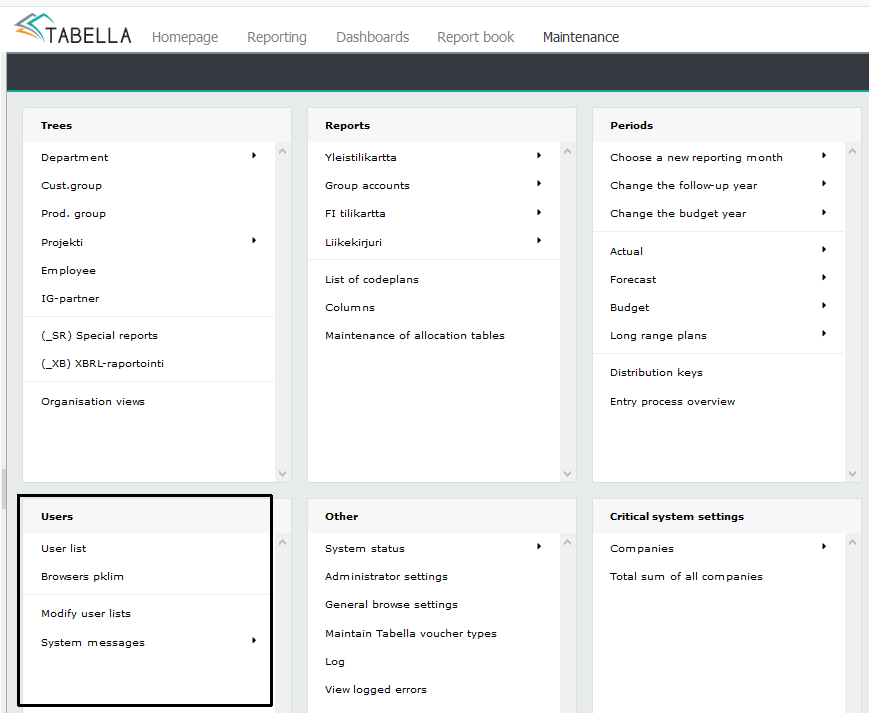
Users
Note
Depending on the contract by supplier and customer purchased Tabella, the maximum number of users has been mutually agreed. This number is internally monitored, by using so called CFG -file. In case the number of users have to be increased, modification to the CFG file is needed. Contact the system support.
The CFG file does not affect the database data, or its configuration. File includes user rights to the system, its extensions, and user licenses, as well as the configuration of the company list, opened in Tabellla.
The System Administrator (System Admin) maintains and modifies the system user rights. There can be several System Admins.
User types are: System Administrators, end users with entry and browsing rights, and browsing users, with browsing rights Only.
The scope of the user rights are defined for each usergroup separately. All users, with exactly the same user rights can be grouped together in one usergroup. Each user must belong to a usergroup. The user can belong to several groups simultaneously.
The number of usergroups
The number of usergroups is not limited – every user can even form her own usergroup.
System Administrator’s rights
Separately, from the end usergroups, there is a System Administrator’s own group -super. This gives System Administrator rights to the whole system.
If there are several system administrators, their user rights can be restricted, for only one company, for example.
Sharing users into user lists
If needed, the System admin is able to create user lists, where user rights are maintained. For example, to share end users / browse -users and System Admin(s) to their own user lists. User rights for each user list, is defined in the same way. See also chapter Modify user list.
Users and usergroups
Choose “Userlist”
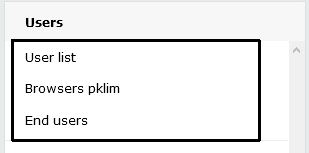
In the example, there are three user list.
In a nutshell, adding a new user is as follows: on the Users tab, a new user is added. A code, text and password, is defined for the user. In the User group column, the user is either attached to an existing usergroup, or a new usergroup is created for the user.
A new usergroup is created on the Groups tab, by entering code and name for the group. Next, user rights are defined for the group, for different parts of the system. Once the rights have been granted, the user is connected, on the Users tab, to a new group.
Finally, the changes made are saved.
Users
User rights opens on the Users tab. The list contains all users defined in the system.
On the Users -tab, users are maintained: add / remove users, username, password, usergroup, and the language for the user is determined.
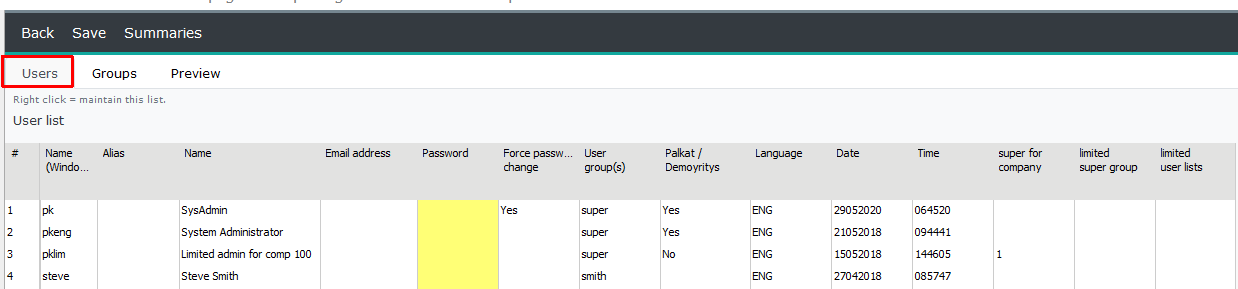
Columns:
Name: user id: -user id used in login.
Alias: -alternative id for logging in (e.g. AD id), optional.
User name: -user name.
Email address -additional information.
Password: -due to data security, not visible.
Force password change: -Yes/No when user logs in.
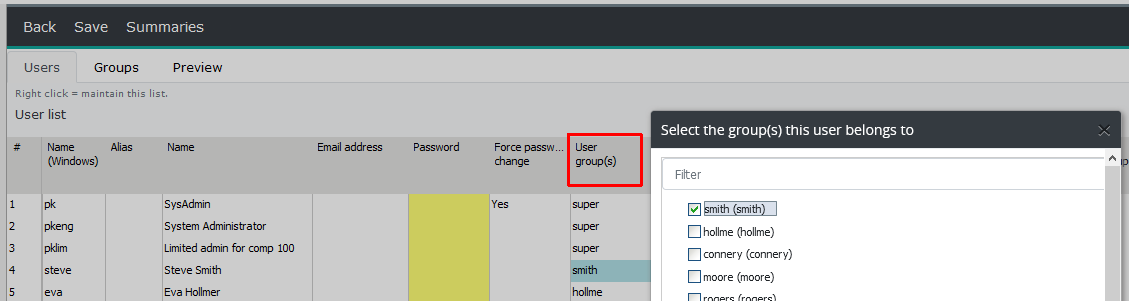
Usergroup(s): -usergroup a user belongs to. If a user belongs to several usergroups, marking displayed is _Many_.
Salaries company: -only, if Salary company is in use.
Date: -date, when a user has been added to the list.
Time: -time, when a user has been added to the list.
Language -chosen system language for the user.
System Admin only
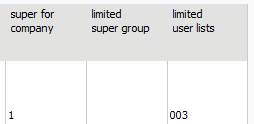
Super for company: -restricted company rights, only for selected companies.
Limited super group -super group with limited group rights.
Limited user lists -if users are shared into lists. Userlist(s) the System Admin has rights to, is chosen. Empty, no limitations = rights to all lists.
Note
The CFG file limits the number of Administrators and end users
If the number of users needs to be increased, which exceeds the number of defined users in the CFG -file, the file’s definitions has to be changed. Please contact the system support.
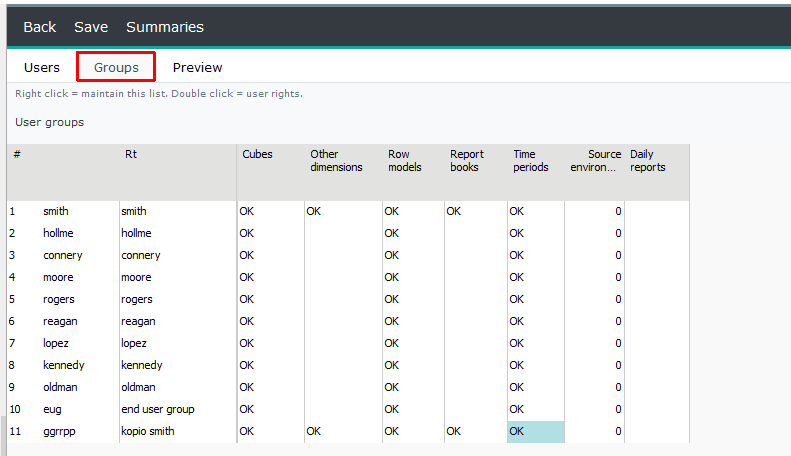
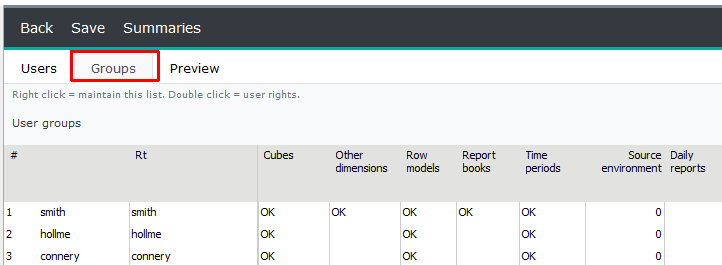
User groups
On the Groups -tab, the usergroup’s basic information is maintained. Move on from the tab, to define group’s rights for the system’s different parts.
Cubes, may include other entities also, in addition to normal cost center (cc) / account.
Other dimensions, e.g. Project
Row models
Report books, add on
Time periods, including versions
Daily reports, add on
Add new user and usergroup
User -tab
If the list is empty, add a new user by right-clicking on the row text and select Add below.
2. Code and name
Define the code = user id, and user name
Note
Do not use any special character in the code. For example, & % ? ¤ ” #, space(bar)
Group “super” is not allowed to use as a code
Enter to the column:
3. Password (max. 38 characters)
The system requires user to change the password periodically, when logging in. When the user changes the password, it is no longer visible to System Administrator -password column is blank. In this case, if user forgets her/his password, System Admin has to define new password for the user. Define a new password, and notify the user.
If System Admin edits user’s, which password is not visible, e.g. changes user name, the password is automatically cleared, and value is set to “empty”. Define a new password, and notify the user.
Force password change. To force a user to change her password when logging in next time. Use right mouse menu to make the selection.
In the user list maintenance, it is possible to set special requirements for the password.
4. User group.
A user can be added to an existing usergroup, with exactly the same rights as the user. Alternatively, new usergroup can be created for the user. To add the user to an existing usergroup, right-click in the column, and select usergroup from the list.
User can belong to several usergroups. If so, then text _MANY_ is displayed on the User group column. User groups are located at the Content -menu, in browsing.
User group ‘super’ has rights to whole system. Therefore it is not required to define any specific rights for a user, who belongs to the group.
5. User rights activation
Note
New user rights are activated for the end user, when the Administrator has saved user rights / changes, run the reports, and after this, end user re-logging in i.e. starts a new session.
System Admin rights limitation
Columns used to limit System Admin’s user rights.
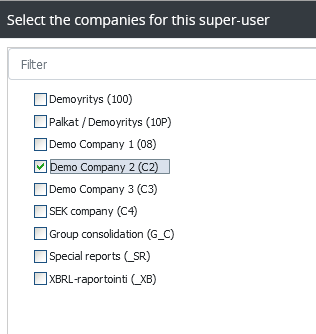
Super for company
If there are several System Admins, it is possible to restrict System Admins rights for only one company, for example.
Note
At least one System Admin has to have user rights for all companies -whole Tabella, therefore user rights limitation is disabled.
Restriction is done in the ” Super for company ” column. Right- click opens the company menu, from which the selection is made. In the example, the rights is limited to one company. In this case, the System Admin functions are limited, for example maintenance of system steerings, can be made for the selected company only. Maintenance functions restricted from the System Admin are disabled.
Note
Limited user rights
own settings only
own chart of accounts
no organisation view maintenance
no Group general maintenance
no setting of system messages
no system closing, voucher type modification, and critical system settings maintenance,
no pricelist maintenance
no Homepage modification
Limited Super group
Please notice, that limited super group selection is alternative to the option super for company -see above. Thus they are not to be used simultaneously.
To limit System Admin’s cost center rights according to selected user group. The usergroup is selected from the right mouse menu. This will limit some of the System Admin’s functions, which are being disabled. For example the change of the reporting period is blocked.
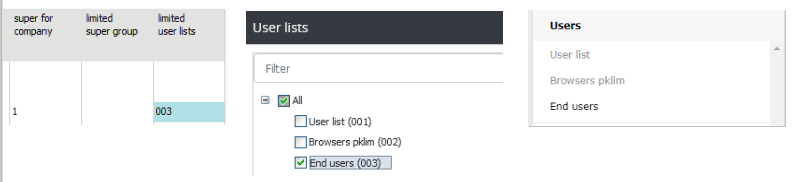
Limited user lists
If the users are shared into lists, the list(s) the System Admin has rights to, is selected from the right mouse menu. In the example, she has has rights to one user list, where the user rights, for the users belonging to this list is maintained.
Note
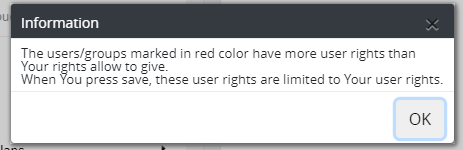
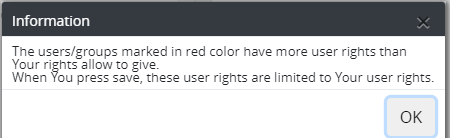
If the end user list, to which restricted system admin has maintenance rights, contains usergroup(s), whose user rights are wider than restricted System Admin’s user rights, a message will follow. In the user group tab such group(s) is marked with red color.
If this happens, please do not save user rights. Consult the System Admin (whos has rights for the whole system) on how to proceed, to remove user group from the end user list, for example.
User-tab row text modification
To open the menu, right click the row text. For example, edit the row’s text and define its highlights.
Add new row -add new row (note the number of users -cfg file limitation).
Modify -modify row’s text or code. Do not use any special characters in the code. For example, & % ? ¤ #, space(bar)
Group -tab
Move on to the Group -tab and create new usergroup.
Right click the row text. Choose Add below
Define usergroup’s code and name.
Note
User group’s max. lenght is 15 characters.
Do not use any special characters in the code. For example, & % ? ¤ #, space(bar).
Defining user rights
Define detailled user rights for the group to different system parts.
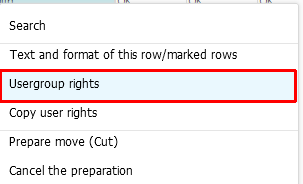
Right click group’s row text. Choose Usergroup rights.
Copy user rights
User group rights can also be copied. Right-click the row text. Choose Copy rights, and from the list, group which rights are copied.
Modify
Groups -tab, right click the row text. For example, to edit the row’s text and define its highlights.
User group rights
User rights are defined one part at a time
Companies and cost centers, A00 (Total sum of companies), Special -reports and Xbrl -reports.
Dimension limitations
Row models
Report books
Time periods and versions
Note
At minimum, a usergroup has to have rights to cost center, row model and time period.
Changed user rights are activated when user logging in next time.
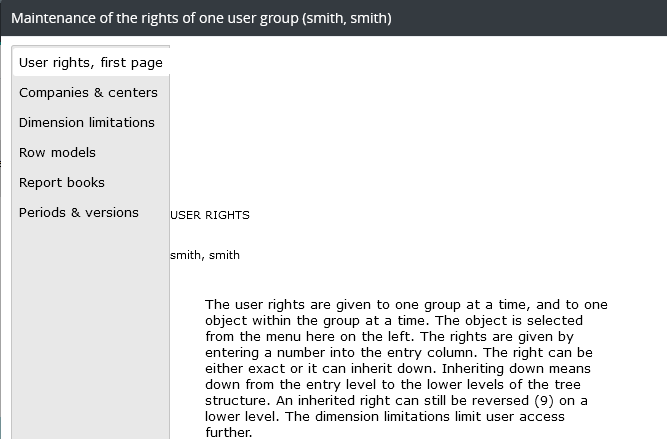
User rights
User rights to all parts are given in a tree structure. Rights are entered in the same way: by entering the number indicating the user right to the Entry - column.
User rights entries (varies for different parts):
Note
The scope of the rights is not same for all parts
End user, whose user type is browse only (see chapter Modify user lists), can not have entry rights.
Example:
Companies and cost centers; Company 1 has entry rights 4 - entry rights to all levels (inherits down), but one group is blocked by entering value 9 - no rights.
Note
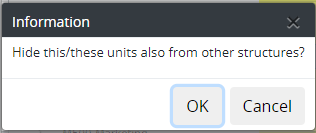
When limiting cost center rights (9). Choose whether the entry rule is changed in all tree structures, where the cost center exists.
By choosing OK, the blocking is done in all tree structures. Cancel, in the current tree structure only.
If the limitation needs to be removed, it has to be done manually from all tree structures.
Save
Once all the necessary rights have been granted, at the minimum cost center and row model rights, return to the Groups tab by pressing OK. Save changes made. To make temporary change, press Save or exit maintenance and save changes. Save either all, or changes made only.
Note
New rights are activated for the end user, when the Administrator has saved entry rights, run the reports, and user logs in next time. I.e. starts a new session.
User rights of different parts:
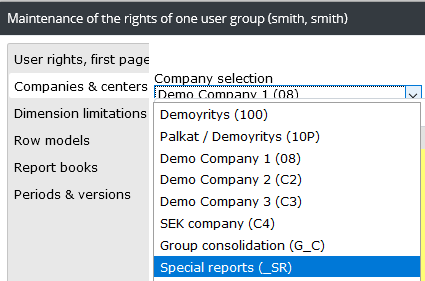
Companies and centers, Special - and Xbrl reports
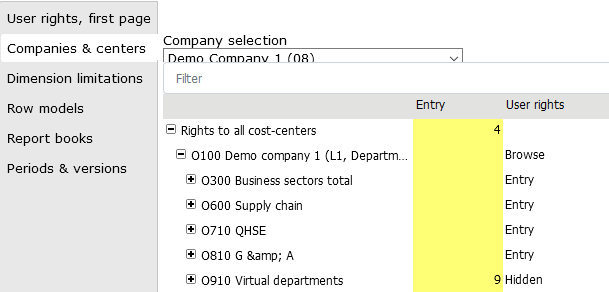
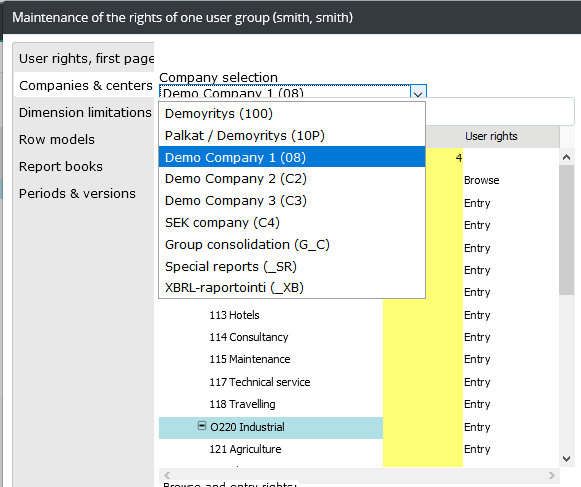
User rights to companies and cost centers. Rights are given separately for each company. Company is chosen from the drop-down menu. If Special reports and/or Xbrl reports are in use, their rights are defined here.
Note
Usergroup has to have rights to cost center, row model and time period, at the least.
The company is selected from the drop-down menu. The list also includes A00 (Company total level), Special Reports and Xbrl Reports, if any.
All tree structures of the selected company are opened for maintenance.
Press the +/- sign, to open / close the tree structure.
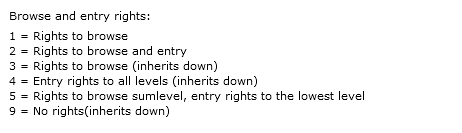
The entry right is entered to the Entry column
1 = rights to browse
2 = rights to browse and entry
3 = rights to browse (inherits down). For example, if entered to a sum level of cost centers, then this value is given to all cost centers belonging to this sum level.
4 = entry rights to all levels (inherits down). For example, from the cost center group level down to all members of this groupcost centers.
5 = rights to browse sum level, entry rights to the lowest level. For example, when entered to sum level, the rights are given to browse all group of cost centers’ sum levels, and entry rights to their cost centers.
9 = No rights (inherits down). For example, entry rights have been given to all levels (4), from cost center sum level, then by using (9), it is possible to limit certain cost center’s rights.
Note
When limiting cost center rights (9). Choose whether the entry rule is changed in all tree structures, where the cost center exists.
By choosing OK the blocking is done in all tree structures. Cancel, in the current tree structure only.
If the limitation needs to be removed, it has to be done manually from all tree structures.
A00, Total sum of companies
If the A00, Total sum of companies is in use.
Special reports
If Special reports are in use.
Note
It is not possible to define entry rights to Special reports, only viewing rights.
Xbrl reports
If Xbrl reports are in use.
After the rights have been defined for the part, next part is chosen.
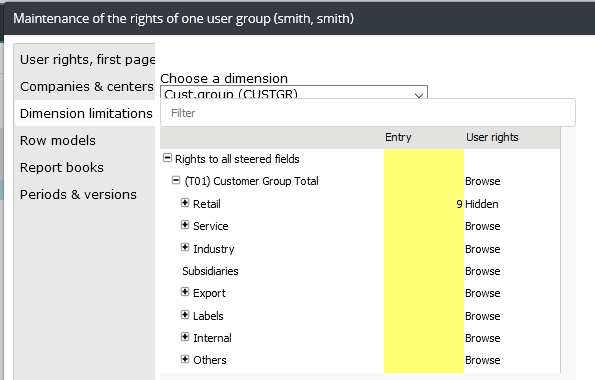
Dimension limitations
The purpose is to limit usergroup’s dimension rights. By default, a group has browse and entry rights for all dimensions.
Limitations are company specific.
Row models
User rights for the compnay’s row models. Row model rights are company specific.
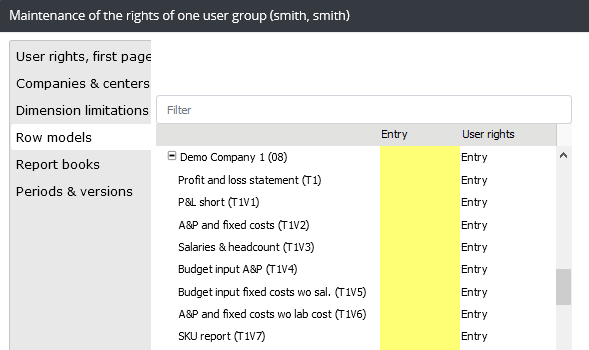
Companies and their row models.
Row models highest level is Rights to all row models.
For example, group has rights to browse and enter data (2), in a company level. For example, entry right (9) is entered to block specific row model.
1 = rigts to browse
2 = rights to entry and browsing
9 = no rights (inherits downwards
Report books
To define user group rights to the Report books, defined by the System Admin. Report book is add-on.
The highest level is Rights to all report books.
Note
If the user has been given rights to Report book, which cost center rights are wider, than user’s own, Report book rights, will overrun user’s current cost center rights. For example, user has rights to only one cost center, but Report book has rights for several cost centers. In this case, she is entitled to see also their data.
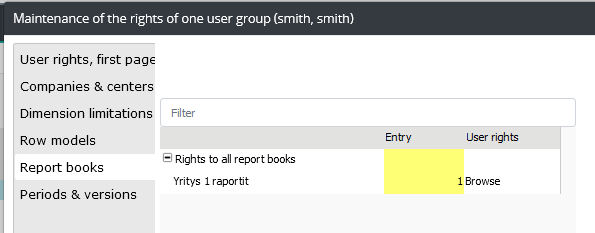
Report book has only browsing rights, not entry rights.
For example, define browsing rights for all Report books (1), but limit certain Report book rights by entering (9).
1 = rights to browse.
9 = no rights, inherits downwards.
Time periods and versions
The highest level is, Rights to all periods & versions. As a default entry right “5” is selected i.e. allowed to browse actual data, entry rights to main versions, no rights to versions.
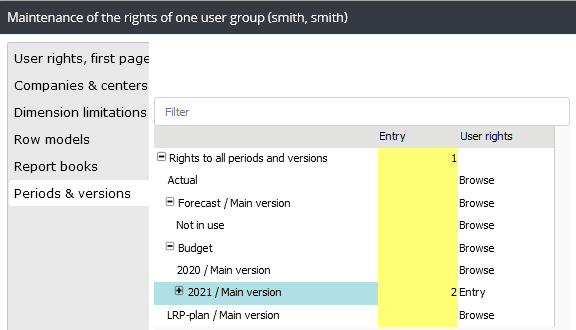
1 = rights to browse.
2 = rights to browse and entry.
3 = Right to browse actual, data entry rights for others (All). I.e. forecast, budget, LRP and versions.
4 = rights to browse actual and versions (forecast, budget, LRP), entry rights to main version.
5 = rights to browse actual, entry rights to main version, no rights to versions.
9 = no rights, inherits downwards.
Once user rights has been defined, exit the user rights maintenance by pressing OK.
Summary
Summaries - enables to browse summaries of user group rights for each section.
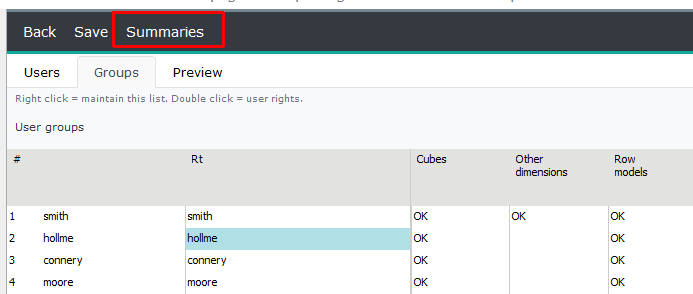
Example: -summary of usergroups’ (columns) user rights. If cell is empty, it means no rights has been defined.
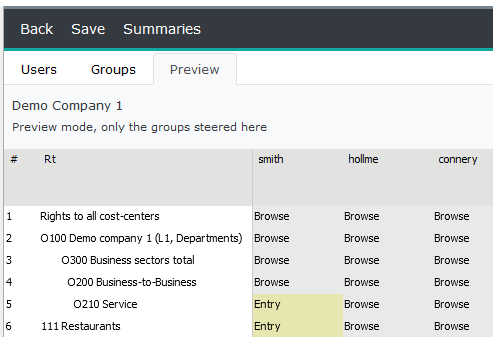
From the summary table it is possible to move on directly to modify user group’s rights. Right-click in the table, and choose Edit user rights. Table changes to edit mode, where user rights are defined from the right mouse menu.
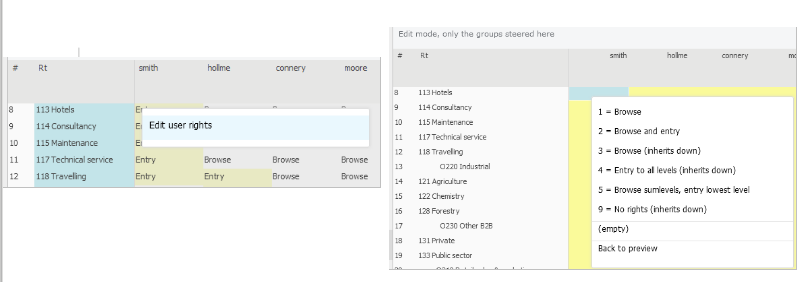
In the same manner, as in the user group maintenance, rights are defined by entering desired number to the cell. Right click the selected cell and choose new entry right number. Use the same menu to exit edit mode. Choose: Back to preview.
Note
In the dimension edit mode rights only for those dimensions, which rights have been changed is shown, otherwise table is empty.
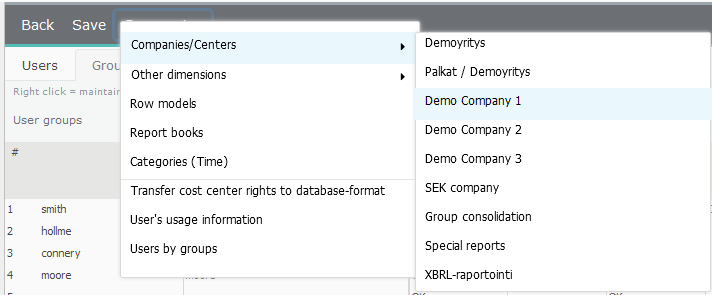
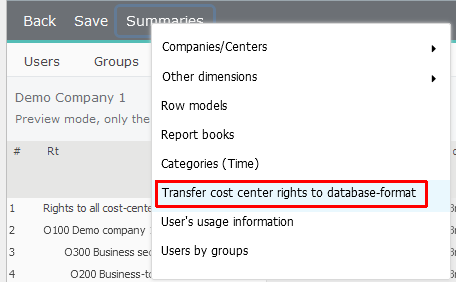
Transfer cost center rights to database format
Selection creates a summary table of detailed user rights for every user group. Table (or part of it) can be copied and pasted to Excel, for example.
Users’ usage information
Table contains overview of users’ login information, for example the number of logins.
Users by user group
Summary of users and their user groups
Modify user lists
If needed, users can be divided into different user lists, where their user rights are maintained. For example, administrators and end users divided into their own lists.
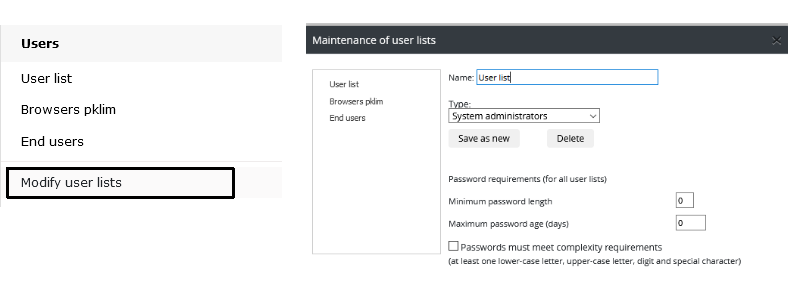
The user list types are: Administrators, End Users, and Browsers.
Note
The user with browsing rights, is blocked from entering data. Own browsing list must be created for users with browsing rights.
Add new list
To add a new list, define name, and select type from the drop-down menu, for example, Browse only -user. Press Save new -button.
New list is added to Users menu. Choose list, and define users and usergroups to the list.
Delete user list
Click lists name in the left frame, -color changes, press Delete.
Note
If the end user list, to which restricted system admin has maintenance rights, contains usergroup(s), whose user rights are wider than restricted System Admin’s user rights, a message will follow. In the user group tab such group(s) is marked with red color.
Do not save entry rights, but check with the Administrator (who has rights to the entire system) how to proceed. For example, whether to remove a user group from the restricted administrator’s end user list.
The restriction of System Admin is explained in more detail, in the User’s maintenance chapter: Add new user and usergroup.
Password requirements
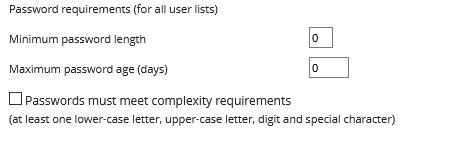
The password requirements applies to all userlists, and thus all users.
Password lenght
specifies how many characters long the password must be. If minimum length is set to zero (0), passwords of all lengths are accepted. The condition comes into force, when the user changes her password next time.
Maximum password period
determines how many days password is valid, and then must be changed. The scheduled report run (run normally every night), goes through userlists, and password exeeding the defined value, are marked to be changed. Then user must change her password next time she logs in.
Passwords must meet complexity requirements
if selected, the password must contain at least one lowercase letter, uppercase letter, number and special character. The condition comes into force, when user changes her password next time.
Note
Password requirements do not apply, when the System Admin changes user’s password in user maintenance. Password requirements are valid only when the user changes their password.
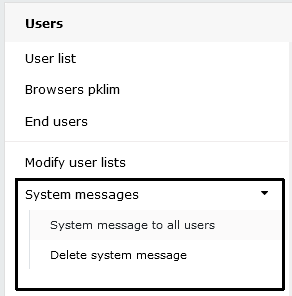
System messages
Choose Maintenance | System messages
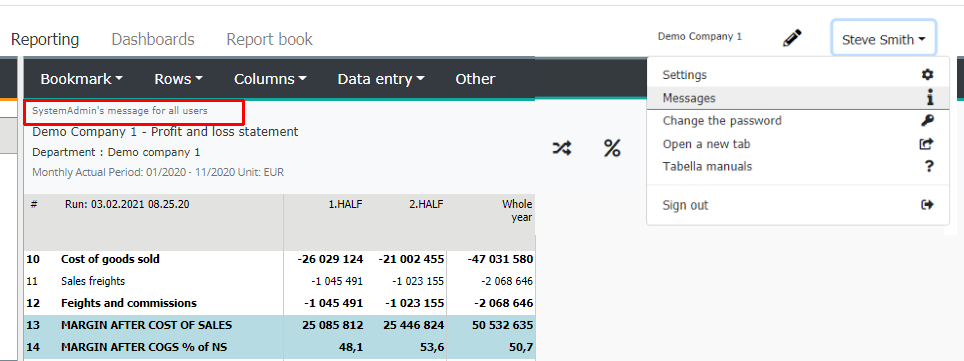
If needed, the System Admin can write a short “permanent ” message to users. Message is displayed when users log in, on the home page. See image below.
Choose System message to all users. Write short message, and press OK.
The message is deleted from the same menu. Choose **Delete system message.*
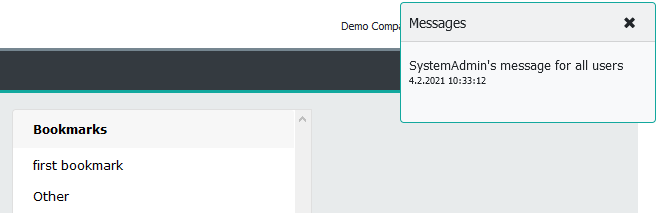
The message is displayed to the end user at login. The message can be opened from the user’s own settings, by selecting Messages. The message will also be displayed in browsing, in the title of the report.