Allocations: Dynamic and allocation tables
Allocation definitions
The allocation tab is opened for maintenance in the List of codeplans maintenance. Select tick box Allocations in use.
Move on to chart of account maintenance and choose Allocations -tab.
Allocate:
From one organization to another, or from different organizational level to another level.
Account to account.
Expenses / returns / other parts. For example, allocation of rents of manufactured products in proportion to department’s floor area(sq. meters).
Allocations are made automatically for all specifications. I.e. specifications found from the allocated sum of account, are transferred to the allocation target.

In the Allocation tab, to add new row (allocation), right click empty row text. Choose Add below.
Define the code and name. Press OK.
Note
It is not allowed to use any special characters in code’s name. For example: ? & % _ / space(bar)
Comment
Write a short comment about the allocation (max. 48 characters).
Allocation column definitions are made from the right-click menu.
SOURCE
Company -company code, which data is allocated.
Unit -the start level. Source unit can be one cost center, or sum of cost centers, from the organization selected in the Company.
Account code -the source account code. Can can be either individual account, or sum of accounts. Selections methods:
Dimension name -additional specification, according to selected dimension. For instance market area.
Dimension value -value for the chosen dimension. If left empty -all are included, or specified dimension is selected.
COUNTER ENTRY
Counter unit - the unit, where the counter code is registered to.
Counter account code -counter account, where the allocation is automatically registered to.
Counter account code, into which allocation is registered to, has to be created to the chart of accounts. Account is steered, like any account, to the selected row model.
It’s a good idea to use a distinctive code, when naming the account.
Note
If Counter Code is used in allocation between different companies, then both companies has to be included to the report run.
When the cost centers are being summed up, the number is shown once.
If the Counter Code, is left empty, no counter registration is done
It is possible to do counter entry, by utilizing manual data entry. Create counter account and enter counter code manually. Please notice, that also in this case, the counter code should be left empty.
TARGET
Target company -company into which data is allocated to. In case allocation uses allocation tables (explained below), it is determined by the company marked here.
Note
Allocations from source company to another target company, with different chart of accounts, is made to the target company’s chart of accounts. I.e. target company determines what allocations received from other companies.
Unit - the target level. It can be one cost center, or sum of cost centers.
When using the sum level, the unit defined is the level, from where the allocation starts downwards. It is possible to utilize either ”Driver” , or allocation table, as a basis for allocation.
Notice, if allocation table is used, the Target unit shoul be left empty.
Account code -the account code of the receiving account.
When allocation starts, the target account for all target company’s cost centers, is emptied. Therefore account should not have any manually entered data, or data transferred from bookkeeping system.
-target account code, into which data is allocated to, has to be created into chart of accounts, and steered to the selected row model. It is recommended to use a code, which clearly separates it, from the other codes used in the chart of accounts. Enter the created account code here.
Note
The allocation target, should always be the account, not the sum of the accounts.
When the allocation starts, the target code for the target company’s all cost centers is emptied. Therefore the account should not have any manually entered data, or data transferred from the bookkeeping system.
Dimension name -additional specification, according to selected dimension. For instance market area.
Dimension value –value for the chosen dimension. If left empty -all are included, or specified dimension is selected.
ALLOCATION
Dynamic allocation
Driver account code -driver used with the dynamic allocation. Allocation is done according to selected account/sum of account’s code. Driver is used as a basis for allocation, when sum level is selected to the Target unit column. Driver defines dynamic distribution ratio, as a basis.
In dynamic allocation it is possible to utilize codes found from the chart of the accounts, or row model already. For example, pieces, euros, sq meters etc.. Choose the code here.
In the dynamic allocation, the distribution basis (percentage -i.e. driver) is changing, according to transferred or manually entered data. Contrary to the use of allocation tables, wherein the percentages used, are fixed.
Dynamic percentages are formed as follows; the cost centers of the receiving cost center group, where the costs are incurred, receives their proportional share of the total cost of the group.
If one cost center has costs for 1000€, and the total costs for the cost center group is 10000€, then the distribution basis for this cost center is 10%. The dynamic effect is achieved, because the incoming costs is changing. Additionally, the scope of cost centers can be changed -the cost centers to which data is allocated to.
If a new driver is needed, for example number of employees, new account code is added to the chart of account, and steered to row model. Data is entered manually to the new account.
New account is chosen as the driver value.
Only pos/neg -if the driver’s sign varies, it is possible to define whether positive or negative numbers are used in driver. If left empty (default), the driver is fixed. Option for Driver 2 also, if used.
Driver account code 2 -if needed, the code for the second driver can be used.
Driver unit-choose driver unit.
No allocation to source unit -defines whether the source center can also be the target center. Mark 1 = No, the source can not also be the target.
Empty -internal allocation within the center is allowed.
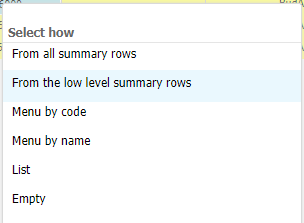
Allocation table
Allocation table -used instead of the dynamic allocation. From the list allocation table, which contains percentages according to which the allocation is done, is selected.
How to define allocation tables, see chapter: Allocation table maintenance.
Note
If Target unit chosen, is a sum of cost centers, then either the %-table, or Driver has to be used in allocation.
Notice, if allocation table is used, the column Target Unit should be left empty.
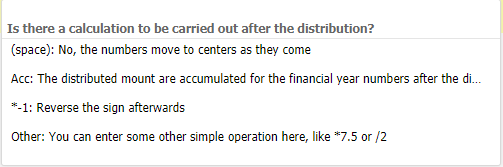
Calculation -calculation, which are done after the data is being allocated
Periods
Choose time period, where the allocations are in force: Actual / Forecast / Budget / LRP.
Period’s column marked with 1 -the allocation is in force for all periods years. For example, all forecast years / months.
If the column is empty, but is highlighted, the allocations are being furher defined for the period. Right click the header, e.g. Forecast all, and choose Open the group. All forecast years in use, are opened.
Inside the group, a single year can be selected by marking it with 1. To choose single month, open the year, and mark desired months with 1.
Check
In order to scrutinize allocation markings, press Check button. Tabella will highlight with red color, markings which are incorrect. For example, wrong allocation table is defined. Check markings, and do necessary corrections.
Save
When exit the maintenance, use Back button and save changes, although Save button has been used during maintenance.
Next, it is possible to write a brief comment about the changes made.
Report run
Chosen cost centers / accounts are allocated to receiving cost centers when the reports are being run.